
This procedure will assist in adjusting or setting up a new or current Denison Hydraulic Controller.
Skill Level
estimated time to complete: 1 – 1 1/2 hours
If your cross travel is not stopping in a consistent location, check the following.
- Make sure the limit flag maintains a constant distance from t he cross travel limit switch. If the distance varies, the sensing range will also vary, causing the cross travel to stop in a different location every time.
- Make sure the auto lube for the cross travel is functioning properly. The round chrome ways should not be dry and covered in dust. They should have a good coating of way oil on them.
- If all of the above are working properly, the Denison control card may need to be adjusted. The Denison card is located inside the main electrical cabinet.
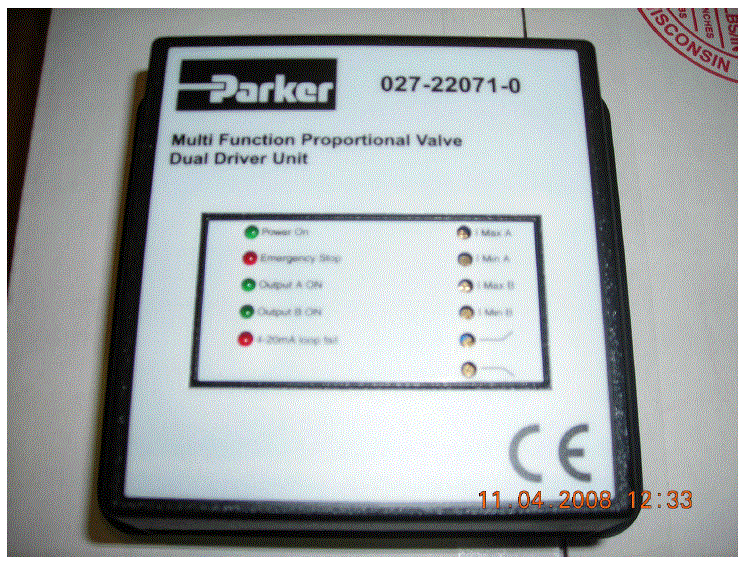
- Max A: Controls TOWARD direction on the max cross travel speed.
- Min A: Controls TOWARD direction on the low cross travel speed.
- Max B: Controls the AWAY direction on the max cross travel speed.
- Min B: Controls AWAY direction on the low cross travel speed.
Ramp up and down controls how far the cross travel will move onto the limit flag and how smooth the transition is from one direction to the other.
How to adjust the denison card
- Set the limit flags so the cross travel will have 10 feet of actual travel. Set the cross travel speed to 100 (High Side). On max speed, the 10 feet of travel should take 6 seconds. You will need to adjust Max A, and Max B for the appropriate direction. Turning the adjustment screw clockwise will increase the speed, and counter clockwise will decrease the speed. NOTE: Be sure both directions are set to the correct speed.
- Once the high side is done, set the cross travel speed to 10 (Low Side) and set the limit flags for 2 1/2 feet of actual travel. On low speed, the 2 1/2 feet of travel should take approximately 15-16 seconds. Again, adjust the Min A and Min B for the appropriate direction NOTE: Be sure both directions are set to the correct speed.
- Once the low side is set you will need to go back and repeat step 1. By adjusting either the high side or low side it will affect the other. You may need to go back and forth between the high side and low side several times until the are both set correctly.
- Once ALL the speeds have been set properly we will need to set the Ramp Up and Ramp Down. (NOTE: These are the bottom two screws noted by the line with an up angle and the line with a down angle.) The ramp down (Line with angle down) will determine how far the cross travel will run onto the limit flag. By adjusting the screw clockwise the cross travel move farther onto the limit flag. Set it so the cross travel stops about 3/4 of the way onto the limit flag at max speed.
- Now you will need to adjust the ramp up (The line wit the angle up) to make a smooth transition from one direction to the other. Begin by turning the adjustment screw clockwise. NOTE: Your cross travel speed should still be at 100%. You should not the cross travel stopping and starting in a smooth motion. If you adjust he screw to far in the clockwise direction it will start to become a sudden stop and start again and will sound like it is slamming. Simply start to rotate counter clockwise until you reach a smooth stop and start motion.
- Once you have everything adjusted you may want to go back and repeat steps 1 through 5 to make sure nothing has changed.