
This procedure illustrates the steps to remove, clean and replace the Quantum Drive spindle gripper set on a Titan 2K-4K. A companion video can be viewed also.
Scan to Watch/Read on Device:

If you have a quickset style gripper -> follow this video
Special tools needed
The Tools needed to remove/replace the gripper set are:
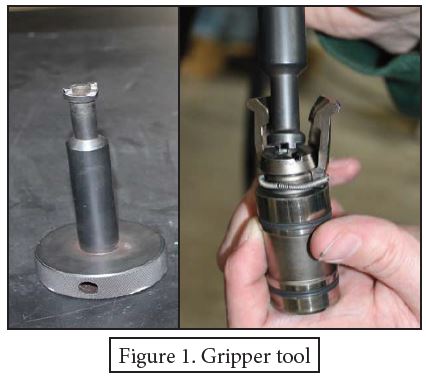
Gripper Tool – (Figure 1) Tool tabs align with slots in gripper set allowing you to hold or rotate gripper set inside the spindle cone. The hollow center allows access via a hex key wrench to the counter nut while holding gripper set stationary.
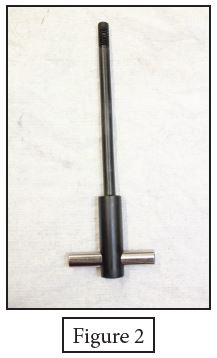
Gripper Puller – (Figure 2) Screws into bottom of gripper set allowing you to move the gripper set inside the spindle.
Gripper Puller – (Figure 2) Screws into bottom of gripper set allowing you to move the gripper set inside the spindle

Depth Gauge – (Figure 3) Used to set/check gripper depth.
Figure 3
T-Handle hex key wrench 5mm – (Figure 4) Used to loosen and tighten counter screw in the gripper set in the spindle.

Removal order
- Manually remove any tool from spindle.
- Set Spindle Disable switch to the ON position.
- At console, extend the drawbar.
• Main menu>Setup>Advanced Setup>Type password: SUNRISE>Extend Drawbar - Insert hex key wrench into gripper tool
- Insert both into spindle and align tabs into gripper slots.
- Loosen the set screw by turning the hex wrench counter clock wise. It should be noted that the gripper tool has to stay in the spindle while completing step 7.
- Pull hex key wrench out and insert gripper puller in.
- Screw in the gripper puller tight, clockwise while lying on your back looking up at bottom of spindle.
- Loosen the gripper set by rotating gripper tool counter clockwise.
- Pull gripper set with gripper puller straight down. It should be noted this will require medium pressure
to pull gripper set out.
Gripper Set Maintenance
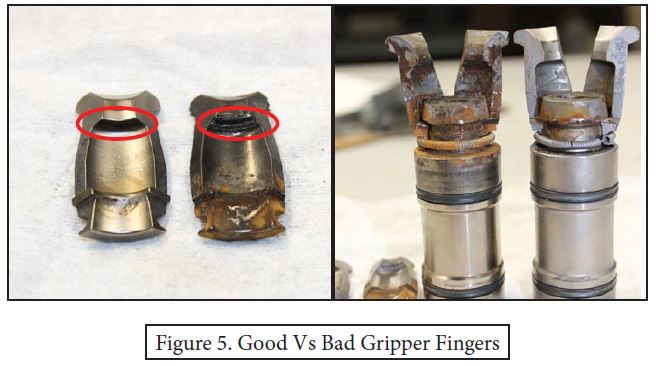
Unscrew the Gripper Puller tool and pull fingers off of gripper set. Clean and inspect fingers for wear, refer to figure 5 for worn-out fingers comparison. Reassemble gripper set and lubricate using METAFLUX Moly-Spray No.70.
Reassembly
- Insert the gripper puller through the gripper tool
- Screw gripper puller tool into gripper set.
- Be certain the counter-screw is threaded into the bottom of the threads in the gripper body to allow for proper placement of gripper on drawbar.
- Screw gripper set into the spindle until the gripper tool is touching the drive keys. Refer to Figure 5.
- Unscrew gripper puller tool with dominant hand and with non-dominant hand hold the gripper tool in place to prevent it from rotating and holding up in place at the same time.
- Pull gripper puller tool out and insert hex key wrench into the center of the gripper.
- Tighten counter-screw and check depth using the following steps:
- Zero the depth gauge on a flat surface.
- Be certain that there is no dripping water when going to use the digital depth gauge, it will cause issues with the measurements.
- Insert the depth gauge into the spindle until the base rests on the flat of the spindle and the tip of the digital depth gauge is on the flat region at the center of the gripper being certain it is not in the slots for the hollow gripper tool or the center of the gripper where the hex key wrench would go. See Figure 6.
- Depth should be 3.573” with ±0.004″ of tolerance.
