
A step by step guide on replacing the Tsunami automatic water separator assembly.
Scan to View on Mobile Device

Printer Friendly PDF version you can download below.
Tools and Supplies:
- Wrench set
- Philips screwdriver
- Pliers
- Loctite 567 (or equivalent) or Teflon tape
Turn off the air at the source and machine. Confirm air pressure has been purged from the system
Detach the main air supply, and the top and bottom air tube from the diverter-block between the Tsunami water separator and the coalescing filter.
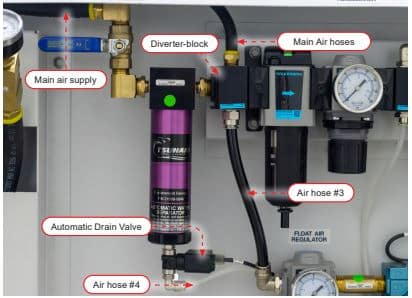
Remove the air hose from the bottom of the Tsunami water separator
Unscrew and separate the coil plug.

Remove the bracket on the side of the coalescing filter

Remove the Tsunami Water Separator along with the elbows (2), ball valve, and diverter-block.
Note: be careful not to lose the o-ring.

Separate the Tsunami Water Separator from the assembly

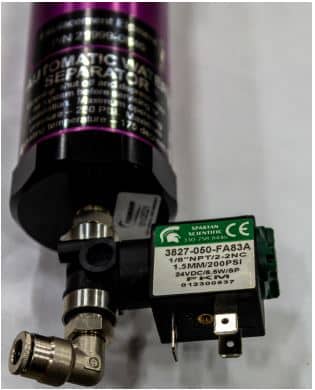
Remove the new Tsunami Water Separator’s bottom cover.
Remove the pin to disassemble the float assembly. Remove the remaining float assembly

Add sealant, then attach the automatic drain valve ½” to the bottom cover
Add sealant to the two pipe nipples on the elbow and diverter-block. Attach the ball valve pipe section to the inlet, and the diverter-block to the outlet. Attach to the Tsunami water separator ⅞” (for the manifold to Tsunami connection).
Note: Check that the o-rings are placed correctly in the coalescing bracket.
Note: An arrow on the water separator block will indicate direction of air flow

Attach the assembly, including the hoses and the coil plug.
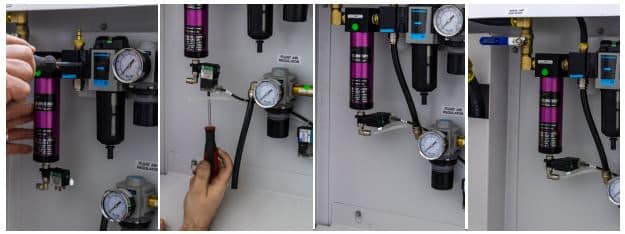
Turn on the air from the source and machine; check for leaks