
X & Y axis referencing after a motor or drive removal or replacement
Scan to Watch on Mobile Device:

This procedure is normally done after replacing the drive on a Titan or Fusion X or Y axis. This procedure assumes the power is off and drive has been replaced.
- Press the e-stop on the operator station.
- Power up the machine (DO NOT TURN SYSTEM ON).
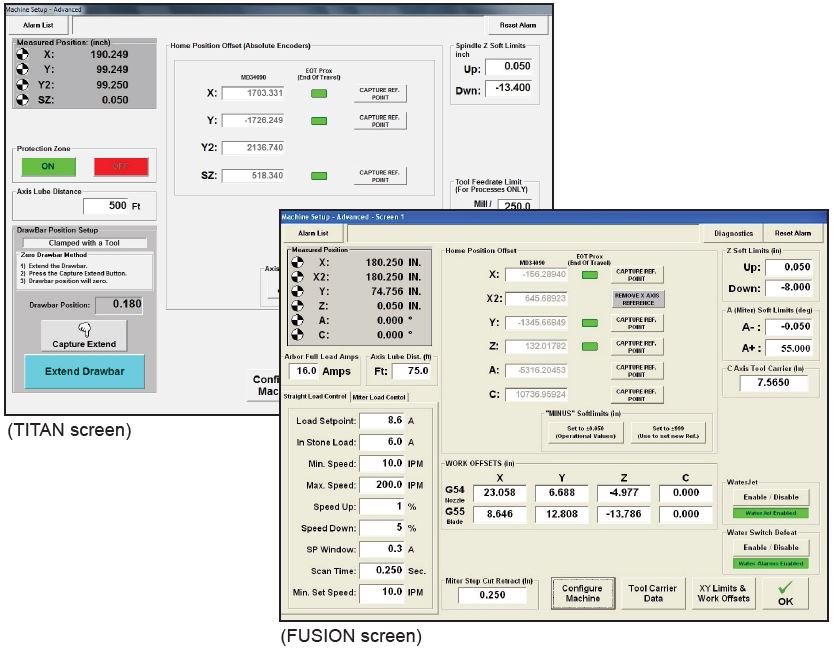
- From the main screen press the SETUP button then the ADVANCED SETUP button. Password is SUNRISE.
- Press the CAPTURE REF. POINT button on the axis to be referenced.
- NOTE: On the FUSION the X and X2 and on the TITAN the Y and Y2 axes will reference at the same time.
- The screen will display a message, press YES to proceed.
- Press the EXIT button in the lower left corner to exit the application. Shut down Windows software normally.
- Shut down the supply power to the machine for 2 minutes, turn on supply power.
- Restart the machine software (
DO NOT TURN SYSTEM ON). - A message will popup notifying you that the machine has been rebooted with an axis that has been referenced.
- Open the ADVANCED SETUP screen and verify the axis you just referenced displays -0.100.
- NOTE: For dual axes mentioned in Step 4 BOTH axes should display -0.100, if not start over at Step 4.
- Press the button to maximize the soft limits of the machine.

- Disengage the e-stop and press the SYSTEM ON button
- Using the Pendant move the machine in the NEGATIVE direction using the “F2” speed until thegreen box corresponding to the correct axis turns black.
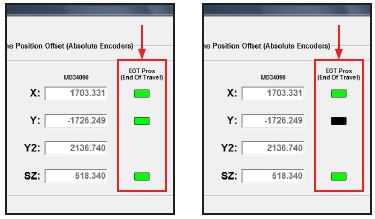
- Once the box has turned black reset the alarm and select the “F1” speed setting on the pendant.
- Drive the machine in the POSITIVE direction one click at a time until the box turns green.
- Be sure to pause momentarily after each click of the dial on the pendant. The idea is to drive the machine just to the point of being off of the limit proximity sensor.
- Once the box has turned green, press the CAPTURE REF POINT button for the corresponding axis you are referencing.
- The screen will display a message, press YES to proceed.
- Press the EXIT button in the lower left corner to exit the application. Shut down Windows software normally.
- Shut down the supply power to the machine for 2 minutes, turn on supply power.
- Restart the machine software (DO NOT TURN SYSTEM ON). A message will popup notifying you that the machine has been rebooted with an axis that has been referenced.
- Open the ADVANCED SETUP screen and verify the axis you just referenced displays -0.100.
- NOTE: For multiple axes mentioned in Step 4 BOTH axes should display -0.100, if not start over at Step 4.
- Move the machine in the axis that you just referenced to the extents of its movement (If you have If other axes need referenced repeat procedure, otherwise continue maintenance procedures or
- If on a fusion you need to recapture your table 0,0 location ( dual tanks do both tables) and cut a calibration square.
- If on a Titan check the tool pocket locations and complete a core hole test to offset the SL laser.
- return to service if no further maintenance is required.