
Corrective measures to take for lessening or eliminating rotation vibration in the Wizard main spindle
Scan to Read on Device:

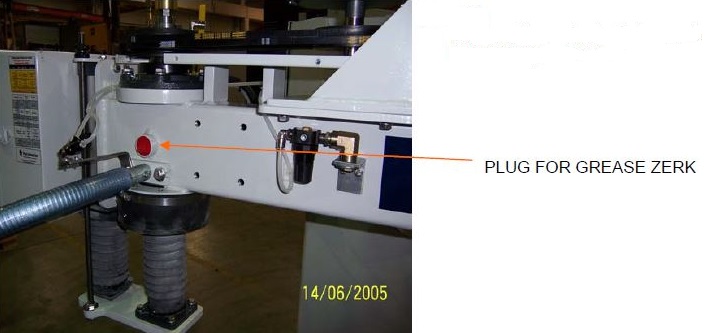
Remove the main shaft plug on the secondary arm to reveal the grease zerk.
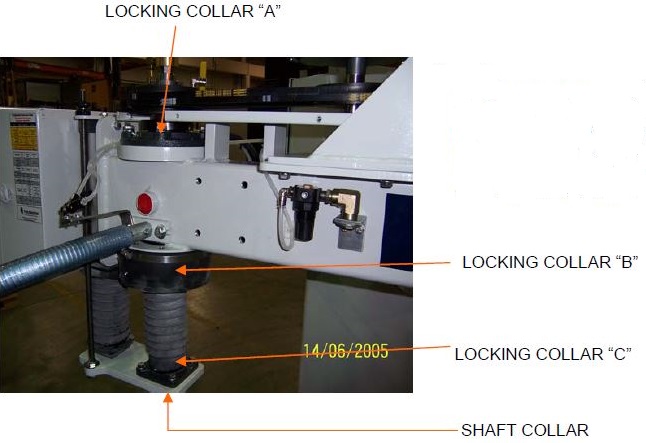
With the grease zerk facing you, the splice in locking collar “A” should be in the 8 o’clock position. The splice in locking collar “B” in the 4 o’clock position. The splice in locking collar “C” in the 11 o’clock position. The set screw in the bottom shaft collar in the 5 o’clock position. Tighten all collars.
Next it is very important to remove any play in the thrust plate bearing. This is achieved by loosening locking collar “C” and pushing up on the bottom of the spindle shaft. Tighten the collar back up while maintaining upwards pressure on the shaft.
After tightening all of the collars, it is necessary to make sure that the spindle moves up and down freely. If not loosen one collar at a time to see which one is too tight, and re-adjust the tightness.
Next, install the sheave on the spindle. Position it so that the set screws are in the 8 & 2 o’clock position. Before tightening, place a straight edge from the motor sheave to the spindle sheave, and ensure that they are parallel with each other. It may be necessary to rotate the sheaves while doing this, as often there is quite a bit of runout. Try to level the sheave out between the runout. (NOTE: IT IS POSSIBLE TO ELIMINATE SOME OF THE RUNOUT BY PLACING A DIAL ON THE BELT SEATS OF THE SHEAVE, AND TIGHTENG THE SET SCREWS ON THE CORRELATING SIDE TO MAKE THE MEASUREMENT BETTER)
Once again, make sure that the spindle moves up and down freely. If not it may be necessary to loosen the set screws on the sheave until it moves freely.
Install the drive belts and adjust the tension. At the correct tension, you should be able to push the belt inwards around 1/2” in the middle of the two sheaves.
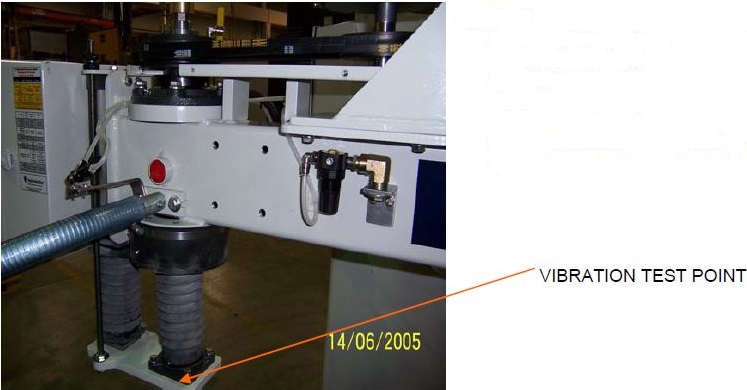
Power the machine up and open up the air supply. Turn on the spindle and bring it to 3500rpm. Run the spindle up and down several times to check the vibration. The vibration should be felt on the thrust plate across from the end mounting bolt. The spindle should also have no “chattering” when moving up or down.
The vibration levels should also be checked and noted at 3000 rpm, 2500 rpm, 2000rpm, and 1500 rpm. At each speed move the spindle up and down to check for chattering or how fluid the spindle drops. It should drop freely at 2-5 psi.
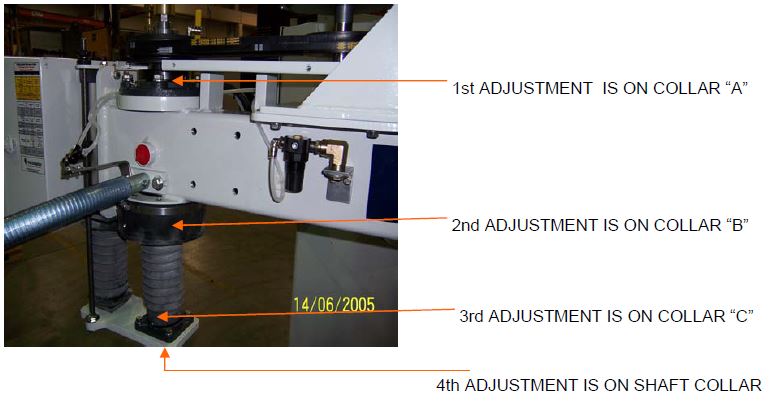
The first adjustment is made on collar “A”, and subsequent adjustments are made by working your way down. This is shown in the above picture. Adjustments are made by turning the collars in either direction, until the vibration lessens. It is advised to make a reference mark of where the splices are on the locking collars before moving them. When the vibration levels are at the best level, move on to the next adjustment point. All levels of vibration should be checked and noted at the speeds described in step # 9.
If after all of the above adjustments have been made, and the vibration level is still not acceptable, the last adjustment can be made at the spindle sheave. First mark the position where the splice is. Next loosen the set screws, and use a 1/2” bolt in the middle hole of the bushing to loosen the sheave slightly. Place a 1” wrench on the flats of the lower spindle shaft and with your other hand hold the belts firmly and rotate the wrench in the direction desired. Tighten the sheave back up, and check vibration level. If worse, try to turn it in the other direction. If this still does not bring the vibration to an acceptable level, the spindle is bad and should be replaced with a new one.